
AWS CLI
AWS CLI standing for Command Line Interface is a simple utility that allows you to access AWS services via the command line. It is located between the user and AWS to access and use the different services from our computer.
It allows you to do many more things than the AWS management console, and allows for instance to automate operations such as file copies, virtual machine creations, maintenance and network operations, AWS services and APIs, to just name a few.
1. Installation
The command line is written in Python, so the only requirement is to have Python installed on your machine. It works well on Windows, Linux or MacOS; I used MacOS and Python is already installed, so I just typed:
pip3 install awscli
In order to not directly use my AWS root account for my manipulations, I started by creating an IAM user (Identity and Access Management) using the Amazon management console, and I gave to this user the same rights as an administrator. I also choosed as access type both programmatic access (to have an access key ID and secret access key) and AWS management console access.
2. Configuration
It is very simple to configure AWS CLI from the terminal, you just need to type the following command:
aws configure
And, as shown on the following figure, 4 parameters needed to be entered.

All manipulations and commands on the instances are linked to this specified region.
3. Some commands
To use the CLI, it will always take about the same form: specifying the aws executable, the service (ec2, s3…), the function of the service you want to use (describe-instances…), the parameters, options to explore the CLI response.
aws <service> <function> --parameters --option
3.1. Key pair for SSH-accessing instances
It is simple to create a key pair just by using the following command on a CLI terminal:
aws ec2 create-key-pair --key-name cliKeyAws --query 'KeyMaterial' --output text > cliKeyAws.pem
The option –key-name is the key pair name; it is mandatory to have a name, so this option is required.
–query ‘KeyMaterial’ is just an option for restricting the output of the command to the actual contents of the private key, without any other data like the fingerprint or the key ID.
As with the creation using AWS management console, the private key is not stored in AWS but rather in a computer, here in the corresponding repository; the fingerprint and the key pair ID are stored in AWS.
3.2. Security group
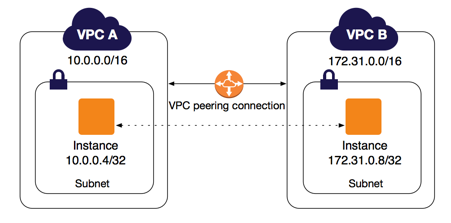
A security group is like a firewall for a VPC standing for virtual private cloud. You can create it by typing the following command:
aws ec2 create-security-group --group-name cli-secu-group --description "created using CLI" --vpc-id vpc-1b9ffa70
where here vpc-1b9ffa70 is the ID of my default VPC that is available on AWS.
As by default all inbound traffic is allowed, it is good to add new inbound roles to allow limited traffic. I like to allow SSH connection from my computer, and HTTP and HTTPS connection from any other computer, so I type the following commands:
aws ec2 authorize-security-group-ingress --group-id sg-02e16e366db1862c1 --protocol tcp --port 22 --cidr 176.160.140.146/32
aws ec2 authorize-security-group-ingress --group-id sg-02e16e366db1862c1 --protocol tcp --port 80 --cidr 0.0.0.0/0
aws ec2 authorize-security-group-ingress --group-id sg-02e16e366db1862c1 --protocol tcp --port 443 --cidr 0.0.0.0/0
Here, sg-02e16e366db1862c1 is the ID of the just-created security group.
3.3. An Elastic Block Store (EBS) volume for an AWS instance
EBS volume is just like an additional storage that can be attached to an AWS instance.
I started by creating a volume using Elastic Block Store in EC2 service. You subsequently click on Volumes, then Create Volume and then, on the page that is opened you have to choose its characteristics (type, size… and the availability zone), then click on Create Volume at the bottom of the page. It is all ! But it is simpler using the AWS CLI, you just have to type the following command:
aws ec2 create-volume --volume-type gp2 --availability-zone us-east-2c --size 8
3.4. EC2 instance
Using the following command, I created a Linux virtual server based on Ubuntu OS corresponding to the ami-00399ec92321828f5 image ID on AWS, and I indicated the SSH key pair, the security group, and the instance type.
aws ec2 run-instances --count 1 --key-name cliKeyAws --image-id ami-00399ec92321828f5 --security-group-id sg-02e16e366db1862c1 --instance-type t2.micro
I attached to this new instance the volume that has been previously created.
aws ec2 attach-volume --volume-id vol-012d7fdb59d088b68 --instance-id i-0310322799e25a6d2 --device /dev/sdg
Now, by typing lsblk in the instance terminal, you find another disk xvdg which is present, as shown in the following figure.

Indeed, after having attached the disk to the instance, I typed the following commands to create a file system and mount it to the vol_xvdg repository, /dev/xvdg being the name of this disk on Linux:
sudo mkfs -t ext4 /dev/xvdg
sudo mkdir /vol_xvdg
sudo mount /dev/xvdg /vol_xvdg


Leave a comment