
AWS Linux
Cloud computing and virtualization are two closely related concepts. EC2 standing for Elastic Compute Cloud is the virtual machine service of AWS, it allows for instance to launch servers, administrate them, and even install anything you want in the case of Infrastructure as a Service (IaaS).
Once connected on the Amazon console, we can have a look at the several available services. To create a virtual machine, EC2 has to be chosen and an Amazon EC2 instance has to be launched, as indicated on the following figure.

The Amazon EC2 instance is the virtual server in the cloud. Once clicked on Launch instance, the first step is to choose the AMI image (Amazon machine image) our server is going to execute, what operating system (OS).

Several of these images are released and updated by Amazon, other images are in the AWS marketplace, as you can see on the previous figure. For a Linux virtual machine, I simply selected the first one: Amazon Linux 2 AMI.
As a second step, the instance type has to be chosen, it is the instance size, the amount of CPU, GPU, RAM, storage… suited to our use case. Several families are available. For my free usage, I choosed t2_micro as suggested.

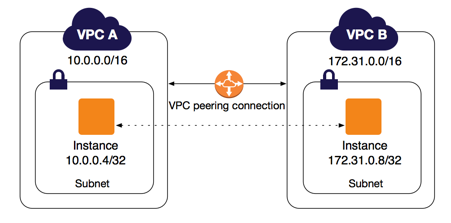
Then, we must configure the instance details: the number of instances, the virtual network containing the instance and our other needed resources. I choosed to launch only one instance, and I choosed the default virtual private cloud (VPC) suggested by AWS. I also choosed the default parameters for storage (it is 8 GB for the chosen instance) and I didn’t add any taggs.
Before the last step, I configured the security group, it is possible to create a new one or just use an existing security group: it is just the firewal rules, allow connexions (SSH, HTTP,…) from users (IP addresses) through ports (22, 80,…). You may even give a name to the security group. As you can see on the following figure, I added two rules: to allow SSH on port 22 only from my IP address, and another rule to authorize any user to access to a web server that can be installed on this instance.

It is useful and secure to assign a SSH key pair in order to connect to the remote server, so I created and download a new SSH key pair, as shown in the following figure.

After launching the instance, it is available in less one minute. You can see it is running, a lot of informations about the instance: its type, the attached SSH key pair, its security group, its public IP address and domain name… It is now possible to remotely connect to the server via SSH and the key pair. In the following, it is what I type on my terminal.

As the instance can now be remotely controlled, as a system administrator or even as a simple user, I can type different commands to manage disks, users, install applications.


Leave a comment