
AWS (writing in progress…)
Here are a couple of projects I have done with AWS when I first started. I outline the steps that allowed me to complete the projects, and I put special emphasis on detailing the relevant AWS concepts that are involved in these projects.
1. Introduction
AWS standing for Amazon web services is just an ensemble of services. These services are available in the Cloud with a very fast deployment. In the Cloud, it is the on-demand service with Pay-As-You-Go pricing unlike on-premise where there is generally under- or over-consumption of available resources. Amazon like other Cloud providers delivers different kind of services that you can choose according to your needs: virtual machines (IaaS), storage, network, computing, to just mention a few. In the following, I present some use cases of AWS that I implemented after a training in system administration, network and cloud.
2. Getting started with AWS
AWS consolidates an ensemble of data centers in different physical locations across several regions of the world. In order to experiment with AWS resources, you need to create an AWS account as shown in the following figure, and then follow the steps.

After created your account and/or when wanting use AWS, it is asked to connect to the AWS management console, it is just the web interface that allows to use Amazon Web Services. You might end up with something like in the following figure. In my case, I created a simple account and use the free resources, the default region is Ohio in USA but it is possible to change it.

As you can see, AWS has many available services. In the following, I will present some use cases I implemented on AWS.
3. Linux virtual machine (Amazon EC2)
Cloud computing and virtualization are two closely related concepts. EC2 standing for Elastic Compute Cloud is the virtual machine service of AWS, it allows for instance to launch servers, administrate them, and even install anything you want in the case of Infrastructure as a Service (IaaS).
Once connected on the Amazon console, we can have a look at the several available services. To create a virtual machine, EC2 has to be chosen and an Amazon EC2 instance has to be launched, as indicated on the following figure.

The Amazon EC2 instance is the virtual server in the cloud. Once clicked on Launch instance, the first step is to choose the AMI image (Amazon machine image) our server is going to execute, what operating system (OS).

Several of these images are released and updated by Amazon, other images are in the AWS marketplace, as you can see on the previous figure. For a Linux virtual machine, I simply selected the first one: Amazon Linux 2 AMI.
As a second step, the instance type has to be chosen, it is the instance size, the amount of CPU, GPU, RAM, storage… suited to our use case. Several families are available. For my free usage, I choosed t2_micro as suggested.

Then, we must configure the instance details: the number of instances, the virtual network containing the instance and our other needed resources. I choosed to launch only one instance, and I choosed the default virtual private cloud (VPC) suggested by AWS. I also choosed the default parameters for storage (it is 8 GB for the chosen instance) and I didn’t add any taggs.
Before the last step, I configured the security group, it is possible to create a new one or just use an existing security group: it is just the firewal rules, allow connexions (SSH, HTTP,…) from users (IP addresses) through ports (22, 80,…). You may even give a name to the security group. As you can see on the following figure, I added two rules: to allow SSH on port 22 only from my IP address, and another rule to authorize any user to access to a web server that can be installed on this instance.

It is useful and secure to assign a SSH key pair in order to connect to the remote server, so I created and download a new SSH key pair, as shown in the following figure.

After launching the instance, it is available in less one minute. You can see it is running, a lot of informations about the instance: its type, the attached SSH key pair, its security group, its public IP address and domain name… It is now possible to remotely connect to the server via SSH and the key pair. In the following, it is what I type on my terminal.

As the instance can now be remotely controlled, as a system administrator or even as a simple user, I can type different commands to manage disks, users, install applications.

4. Windows virtual machine (Amazon EC2)
Here, the purpose has been to create a Windows virtual machine on AWS and to have access to its desktop from a remote workstation. It is different from what I did with Linux where the remote control was via SSH and only using the terminal.
Like with Linux, I choosed an Amazon machine image and I follow the same steps, here it is a Windows server 2019 image. I had to specify the rules in the security group in order to allow the desktop remote control. And for this purpose, I used RDP protocol of TCP with port 3389 which is suited for that, as illustrated in the following figure.

Once launched the Windows instance on AWS, I used a RDP client to connect it from a remote desktop. As indicated in the following figure, I have entered the DNS address or the IP address of the instance both available on AWS, and I created a password to enable remote access. It is also possible to download the remote desktop file and directly enter the user name and password related to the instance.

Once completed, there is a confirmation message indicating the remote connection and you need to approve to enable the remote desktop control. After about 3 seconds, the remote desktop appears to the screen of the local machine (as shown in the following figure), you may use Windows, configure and install what you want.

5. Storage (Amazon S3)
Amazon S3 (standing for Simple Storage Service) is a service used by many companies and it enables storage of files. For instance, it is possible to host static websites on Amazon S3, store images and videos, archives, save application states (logs). It is part of what is called object storage.
The goal here has been to create storage spaces via S3, know how to use the S3 service, how to use an image already stored in the Cloud.
It started by connecting on the AWS Management Console, and I choosed S3 in the Storage group, then I had this page (see the following figure) suggesting to create a bucket. The bucket can be seen as a container to store the objects representing our files and images. For information, on S3, objects have a size limit (of about 160 GB), there can be a maximum of 100 buckets per AWS account, however each bucket can contain as many objects as desired and thus allows to store a “virtually” unlimited amount of data. One constraint is the unicity of the bucket name over Internet since it appears on the files URLs. Amazon S3 provides APIs to manage all these resources.

As you can see in the following figure, I created a bucket and inside I uploaded some files. In AWS S3, each uploaded file has an URL enabling its access from a browser but before, you have to make public both the bucket (containing the file) and the file so that you don’t get a (by default) denied access.

The created and uploaded files are from a small HTML page. In “img” HTML tags, I put the corresponding URL from S3 as values of the “src” attributes, and as you can see in the next figure the web page is well displayed with everything that is stored in an AWS S3 bucket.

6. Web development environment (MySQL, Apache, PHP and PHPMyAdmin)
In order to install all the features of an efficient web server, there are four main elements that are essential to build a website server:
- Here Linux represents the operating system, and it manages the available resources
- The Apache web server handles user requests
- MySQL acts as a database server to manage the various data
- PHP here is the programming language used to create dynamic web pages. Indeed, it is needed to have a binary that can execute PHP code, much like Python or Java.
6.1. MySQL database (Amazon RDS)
Amazon RDS standing for Relational Database Service is an AWS service allowing to create an environment to execute an instance of a relational database. It is also possible to use EC2 and install a server like MySQL but RDS makes life easier using a preconfigured ready-to-use server.
In the following, I report how to run a RDS server in the AWS cloud.
I have chosen the RDS service present in the Database group and, to launch an instance, I clicked on Create database, then I choosed MySQL as a database management system because it is free. While creating the instance, I have customized the server: several settings like instance name (corresponding to the database server that may contain several databases), master username and password, to indicate in which VPC the server is located, to choose or not the (public) accessibility to the server, to choose the database name… Creating and launching a new instance may take several minutes. When the server has started, Available is indicated as status. As shown in the following figure, more details of the instance are indicated, and in particular the endpoint which is the DNS address of the server.

Special emphasis should be given to the security group that should allow access and connection to the database server. In what I did, I opened all ports and gave access to any IP address, this is not great in terms of security but it allows me to test what I want without being blocked.
6.2. A virtual machine to install Linux (Amazon EC2), Apache and phpMyAdmin
After instancing a virtual machine using Linux as operating system (as shown in a previous section), to install a web site server, there are several steps :
- Update software packages
sudo apt update
sudo apt upgrade
- Install Apache web server
sudo apt install apache2 apache2-utils
apache2-utils installs some useful utilities
- Install MySQL
sudo apt install mysql-server mysql-client
mysql-client package allows you to connect to a MySQL server. It will give you the “mysql” command-line program.
mysql-server package allows to run a MySQL server which can host multiple databases and process queries on those databases.
- Install PHP
sudo apt install php7.4 libapache2-mod-php7.4 php7.4-mysql php-common php7.4-cli
libapache2-mod-php is a PHP library enabling Apache web server to interpret and handle PHP code so that Apache can sent rendered web pages to the clients rather than PHP code.
php-mysql package provides MySQL modules for PHP, to enable association and communication between PHP and MySQL database server.
php-common package contains common utilities shared among all packaged PHP versions.
php-cli package enables to execute PHP files using command line interface
In the following figure, is represented the default page of Apache 2 when the public DNS address of the server is entered in the browser.

- Install phpMyAdmin
phpMyAdmin is a tool that allows us to access and manage our database very easily, because the operations are done in graphical mode rather than with the mysql console.
I describe how to install and use phpMyAdmin from the Linux server.
sudo apt update
sudo apt install phpmyadmin
By typing the previous commands on the terminal of the Linux server, you install and configure phpMyAdmin, there are several steps of validation. When it is installed, you have to set up the configuration file in order to have access to the remote database.
In the file /etc/phpmyadmin/config.inc.php, I added the DNS address of the remote database, as indicated in the following figure.

When done, I launched phpMyAdmin using the DNS address of the Linux server, and as shown in the following figure, I fill in the user and the access password.

As shown in the following figure, it is now possible to remotely manage the AWS database server using phpMyAdmin.

Hence, we have a Linux server hosted in the AWS cloud and integrating PHP, a database server managed via phpMyAdmin through a web interface accessible from the first server: this is a web development environment enabling the creation of dynamic web pages.
7. AWS CLI: Installation, configuration and some commands
AWS CLI standing for Command Line Interface is a simple utility that allows you to access AWS services via the command line. It is located between the user and AWS to access and use the different services from our computer.
It allows you to do many more things than the AWS management console, and allows for instance to automate operations such as file copies, virtual machine creations, maintenance and network operations, AWS services and APIs, to just name a few.
The command line is written in Python, so the only requirement is to have Python installed on your machine. It works well on Windows, Linux or MacOS; I used MacOS and Python is already installed, so I just typed:
pip3 install awscli
In order to not directly use my AWS root account for my manipulations, I started by creating an IAM user (Identity and Access Management) using the Amazon management console, and I gave to this user the same rights as an administrator. I also choosed as access type both programmatic access (to have an access key ID and secret access key) and AWS management console access.
It is very simple to configure AWS CLI from the terminal, you just need to type the following command:
aws configure
And, as shown on the following figure, 4 parameters needed to be entered.

To use the CLI, it will always take about the same form: specifying the aws executable, the service (ec2, s3…), the function of the service you want to use (describe-instances…), the parameters, options to explore the CLI response.
aws <service> <function> --parameters --option
- Create a key pair, used for accessing instances
It is simple to create a key pair just by using the following command on a CLI terminal:
aws ec2 create-key-pair --key-name cliKeyAws --query 'KeyMaterial' --output text > cliKeyAws.pem
The option –key-name is the key pair name and it is mandatory to have a name, so this option is required.
–query ‘KeyMaterial’ is just an option for restricting the output of the command to the actual contents of the private key, without any other data like the fingerprint or the key ID.
As with the creation using AWS management console, the private key is not stored in AWS but in a computer, here in the corresponding repository; the fingerprint and the key pair ID are stored in AWS.
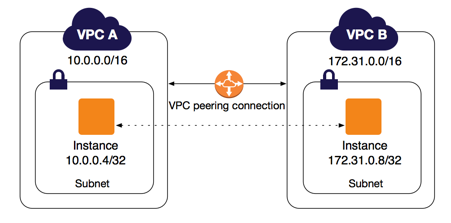
- Create a security group
A security group is like a firewall for a VPC standing for virtual private cloud. You can create it by typing the following command:
aws ec2 create-security-group --group-name cli-secu-group --description "created using CLI" --vpc-id vpc-1b9ffa70
where here vpc-1b9ffa70 is the ID of my default VPC.
As by default all inbound traffic is forbidden, it is good to add new inbound roles to allow traffic. I like to allow SSH connexion from my computer, and HTTP and HTTPS connexion from any other computer, so I type the following commands:
aws ec2 authorize-security-group-ingress --group-id sg-02e16e366db1862c1 --protocol tcp --port 22 --cidr 176.160.140.146/32
aws ec2 authorize-security-group-ingress --group-id sg-02e16e366db1862c1 --protocol tcp --port 80 --cidr 0.0.0.0/0
aws ec2 authorize-security-group-ingress --group-id sg-02e16e366db1862c1 --protocol tcp --port 443 --cidr 0.0.0.0/0
- An Elastic Block Store (EBS) volume for an AWS instance
EBS volume is just like an additional storage that can be attached to an AWS instance.
I started by creating a volume using Elastic Block Store in EC2 service. You subsequently click on Volumes, then Create Volume and then, on the page that is opened you have to choose its characteristics (type, size… and the availability zone), then click on Create Volume at the bottom of the page. It is all ! But it is simpler using the AWS CLI, you just have to type the following command:
aws ec2 create-volume --volume-type gp2 --availability-zone us-east-2b --size 8
-
Create an EC2 instance
-
Shutting down one or more instances

Leave a comment